Last Tuesday night, I pulled a beautiful roasted bird from the oven. The skin looked golden and crispy. But when I sliced into the breast, I knew something had gone wrong.
As an Amazon Associate, this site earns from qualifying purchases. Some links on this page are affiliate links.
The meat was tough and rubbery. Each bite required effort to chew. That familiar disappointment washed over me as I realized dinner was a letdown.
You’ve probably experienced this same frustration. One of the most common cooking challenges home cooks face involves moisture loss during preparation. The good news? This problem has clear solutions.
I spent years struggling with this issue before discovering reliable techniques that work. Through research and testing, I learned what causes moisture to escape and how to keep poultry tender and juicy every time.
In this guide, I’ll share everything I’ve learned about preventing dry chicken. We’ll cover the science behind moisture retention, temperature control, preparation methods, and practical cooking strategies. You’ll never have to serve disappointing, tough meat again.
Key Takeaways
- Understanding moisture loss during cooking helps you prevent tough, rubbery poultry
- Temperature control plays a critical role in keeping meat tender and juicy
- Proper preparation techniques make a significant difference in the final result
- Multiple cooking methods can help you achieve moist, flavorful dishes
- Learning the science behind moisture retention transforms your cooking success
Understanding the Science Behind Dry Chicken
Learning to make moist chicken starts with knowing what happens to protein fibers when they get hot. It’s not just about how long or how hot you cook it. It’s about the chemical changes in the meat. Once you understand these basics, you can avoid dry chicken before it happens.
Cooking chicken is like managing changes in the meat. You want it to be safe and tasty, but not dry. It’s all about finding the right balance.
How Protein Fibers React to Heat
When chicken gets hot, the proteins inside start to change. This is called denaturation. It happens at certain temperatures that affect how your chicken turns out.
At 140°F, proteins start to contract. As it gets hotter, to 150-160°F, they squeeze together more. This pushes out water trapped between them. By 165°F and up, the proteins bond tightly, making the meat firm and tough.
Here’s what happens at key temperature milestones:
- 120-140°F: Proteins begin to denature, meat starts firming up
- 140-150°F: Moderate contraction, some moisture loss begins
- 150-165°F: Significant protein tightening, increased juice expulsion
- 165°F and above: Maximum firmness, rapid moisture loss
The Role of Moisture Loss During Cooking
Chicken always loses water when it cooks. It can lose up to 30% of its weight in moisture. Knowing where this moisture goes helps you keep it in.
Chicken loses moisture in two ways. First, proteins contract and push water out. Second, heat turns moisture on the outside into steam. The longer and hotter you cook, the more moisture escapes.
That’s why timing and temperature control are key. Managing moisture loss is the secret to juicy chicken.
Why White Meat Dries Out Faster Than Dark Meat
Chicken breasts dry out faster than thighs because of their meat composition. White meat has less fat and connective tissue than dark meat.
White meat is harder to keep moist because it has less fat. Dark meat, like thighs and drumsticks, has more fat and collagen. This extra fat keeps the meat moist as it cooks.
The collagen in dark meat also helps. It breaks down into gelatin, holding onto moisture and making the meat juicy. White meat doesn’t have this protection.
Here’s a quick comparison of white versus dark meat:
- Fat content: White meat has 3-5% fat, dark meat has 8-10% fat
- Collagen levels: Dark meat contains significantly more connective tissue
- Cooking forgiveness: Dark meat tolerates higher temperatures without drying out
- Optimal temperature: White meat is best at 160-165°F, dark meat at 175-180°F
This difference in composition means I treat chicken breasts and thighs differently. White meat needs careful cooking, while dark meat is more forgiving. Knowing this lets you adjust your cooking for each cut, ensuring everything is moist.
Why Is My Chicken Dry? The Most Common Culprits
Most dry chicken problems come from a few simple mistakes. Home cooks often wonder why their chicken is dry. The good news is that fixing these mistakes is easy.
Let’s look at the main cooking errors that make chicken dry. Each mistake affects moisture loss in its own way. Knowing these can greatly improve your chicken cooking.
Overcooking: The Number One Reason for Dry Chicken
Overcooking is the biggest reason for dry chicken. Cooking chicken too long makes the meat lose all its moisture. Just a few extra minutes can make tender meat dry and chalky.
Many people overcook chicken because they’re afraid of foodborne illness. This fear is valid, but it leads to overcooked chicken that’s not tasty. The key is to know the safe temperature and remove the chicken at that point.
Here are signs you’ve overcooked your chicken:
- The meat feels tough and stringy when you cut into it
- Juices no longer run from the chicken when sliced
- The exterior appears shriveled or dried out
- The meat pulls away from the bones easily on bone-in cuts
Cooking at Excessively High Temperatures
High heat can also cause problems. It cooks the outside too fast, leaving the inside undercooked. This results in dry meat on the outside and possibly raw in the center.
High heat isn’t always bad. A quick sear can add flavor and color. But, you need to cook at a lower temperature after that.
High temperatures lead to several issues:
- Rapid surface moisture evaporation
- Protein fibers contracting too quickly
- Uneven cooking from outside to inside
- Burned exterior before interior is done
I recommend cooking chicken at 350°F to 400°F. This ensures even cooking throughout.
Skipping Essential Prep Work
Many home cooks skip important prep steps. Not brining, marinating, or seasoning chicken leaves it dry. These steps add moisture and flavor.
Another mistake is not pounding chicken breasts evenly. This leads to overcooking the thinner parts before the thicker ones are done. This makes some parts dry.
Essential prep work includes:
- Brining for at least 30 minutes to increase moisture retention
- Pounding breasts to uniform thickness for even cooking
- Bringing chicken to room temperature before cooking
- Patting the surface dry to promote better browning
- Seasoning adequately with salt to enhance flavor
Not Accounting for Carryover Cooking
Chicken continues cooking after you remove it from the heat. This is called carryover cooking. It can raise the internal temperature by 5-10°F. If you don’t account for this, your chicken will be overcooked.
Many cooks remove chicken at 165°F, then wonder why it’s dry. Carryover cooking can raise the temperature to 170-175°F. That’s too high for white meat.
The solution is simple: remove your chicken 5°F before your target temperature. For chicken, I remove it at 160°F. Carryover cooking will bring it to the safe 165°F. This trick saves many chicken dinners.
Carryover cooking affects different cuts differently. Larger pieces like whole chickens experience more carryover than thin cutlets. Always factor in this temperature rise based on the size of what you’re cooking.
The Critical Role of Internal Temperature
Want to cook chicken that’s moist and tender? Knowing the internal temperature is key. Temperature control is the best way to avoid dry chicken. Relying on cooking times alone is just guessing.
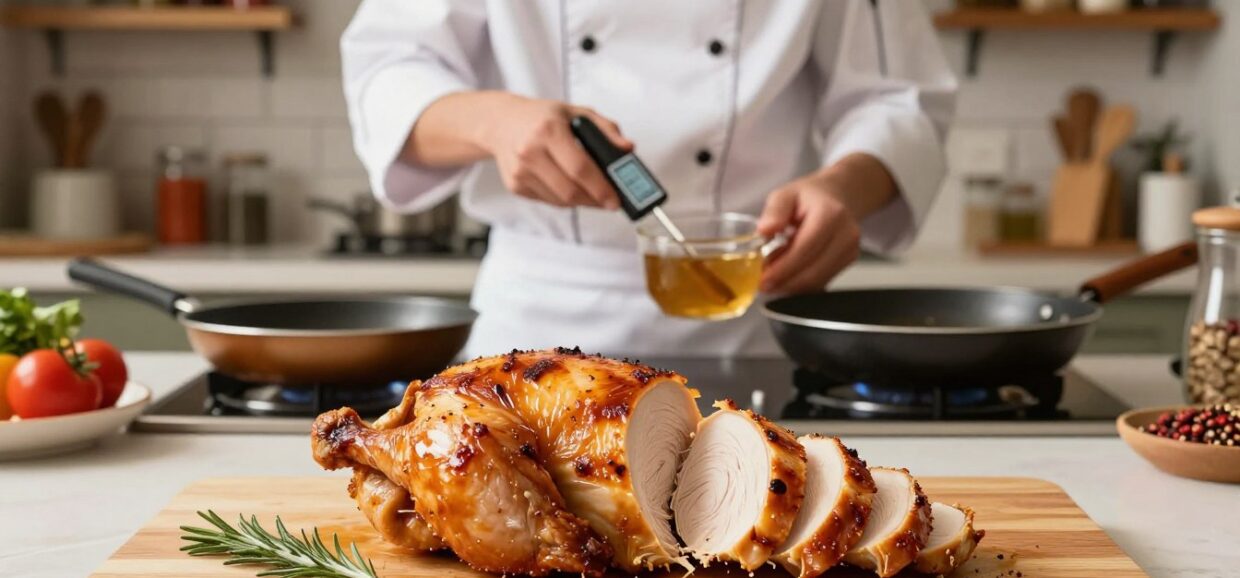
Using a thermometer makes cooking chicken easy. You’ll know when it’s safe and perfectly cooked. Since I started checking temperatures, my chicken has been much better.
Why 165°F Is the Food Safety Standard
The USDA says chicken should be cooked to 165°F. This kills harmful bacteria like Salmonella, making the chicken safe. This rule has kept many families safe from foodborne illness.
But, did you know lower temperatures can also be safe if held long enough? For example, chicken at 160°F for 15 seconds is safe too. This fact can help make chicken juicier.
My Technique: Pulling Chicken at 160°F
I take my chicken off the heat when it hits 160°F. This might seem risky, but it works. The chicken’s temperature rises more during the resting time.
By the time it rests, it reaches the safe 165°F. This method prevents overcooking and keeps the meat juicy. I’ve done this for years, and it always works.
Chicken keeps cooking even after you take it off the heat. Pulling it a bit early compensates for this.
Using an Instant-Read Thermometer Correctly
An instant-read thermometer is a must-have for cooking poultry. Without one, you risk undercooked or dry chicken.
Using a thermometer is simple once you get the hang of it. It takes just seconds and ensures consistent results.
Where to Insert the Thermometer
Always put the thermometer probe into the thickest part of the meat. For breasts, it’s the center. For whole chickens or thighs, it’s the innermost part of the thigh.
But, avoid touching bones with the probe. Bones heat up differently and can give false readings. You want to measure the meat’s temperature only.
I insert the thermometer at an angle, aiming for the center. Wait 3-5 seconds for the reading to settle before checking the temperature.
Best Thermometer Options: ThermoWorks ThermoPop and Lavatools Javelin
I’ve tested many thermometers and recommend two affordable options. The ThermoWorks ThermoPop is fast and accurate, with a rotating display. The Lavatools Javelin is also great, with similar speed and accuracy.
Both thermometers are durable and accurate. I’ve used them a lot and trust them completely.
Choose a thermometer that reads temperatures quickly and accurately. A slow thermometer means keeping your oven or grill open longer, which affects cooking consistency.
Brining: My Secret Weapon for Juicy Chicken
I’ve tried many ways to keep chicken moist, but brining is the best. It’s my top choice for juicy results. Whether you’re cooking breasts, thighs, or a whole bird, brining ensures moist meat.
Brining makes chicken more forgiving if you overcook it slightly. Even then, it stays tender and moist.
How Wet Brining Works to Retain Moisture
Wet brining is simple. Salt in water unwinds chicken proteins. These proteins then trap water, keeping the meat moist.
This moisture stays in the meat even when heated. It acts as a buffer, keeping chicken juicy. This is one of my favorite tips for juicy chicken.
Start by dissolving salt in cold water. Use 1/4 cup of salt per quart of water. You can use kosher or table salt, but table salt is more concentrated.
Add a tablespoon or two of sugar to balance the salt. You can also add aromatics like peppercorns, bay leaves, garlic, or fresh herbs for extra flavor.
Step 2: Submerge and Refrigerate
Put your chicken in a container or large zip-top bag. Pour the brine over it until it’s fully covered. If it floats, weigh it down with a plate.
Always refrigerate during brining. Never leave chicken in brine at room temperature, as this is unsafe.
Step 3: Rinse and Pat Dry
After brining, rinse the chicken under cold water. This removes excess salt. Without rinsing, the chicken might taste too salty.
Pat the chicken dry with paper towels. Dry skin browns better and gets crispier during cooking.
Dry Brining for Maximum Flavor and Crispy Skin
Dry brining is my go-to for skin-on chicken pieces. It gives you crispy skin and moist meat. It’s simpler than wet brining and saves space in the fridge.
This method works by salt drawing moisture out of the chicken. Then, that moisture dissolves the salt and carries it back into the meat. The skin dries out in the fridge, leading to crispy results.
Applying Salt Directly to the Skin
Sprinkle salt over all chicken surfaces. Use about 3/4 teaspoon of kosher salt per pound. Make sure to get salt under any flaps of skin and on all exposed meat.
Rub the salt in gently so it sticks to the surface. Don’t be shy with the salt—it needs to penetrate the meat to work its magic.
Refrigerating Uncovered for Best Results
Place the salted chicken on a wire rack set over a baking sheet. This allows air to circulate around the entire piece. Refrigerate uncovered for the recommended time.
Uncovered refrigeration lets the salt penetrate the meat while drying the skin. This dry skin will turn golden and crispy when cooked.
Brining Times for Different Cuts
Timing is key with both brining methods. Too little time won’t give you the full benefit, while too much time can make the texture mushy. Here’s my guide for how to keep chicken moist with proper brining times:
- Chicken breasts (boneless): Wet brine for 30 minutes to 2 hours; dry brine for 2 to 8 hours
- Chicken breasts (bone-in): Wet brine for 2 to 4 hours; dry brine for 8 to 12 hours
- Chicken thighs and drumsticks: Wet brine for 2 to 4 hours; dry brine for 4 to 12 hours
- Whole chicken (3-5 pounds): Wet brine for 4 to 12 hours; dry brine for 12 to 24 hours
- Chicken wings: Wet brine for 1 to 2 hours; dry brine for 2 to 8 hours
I never brine chicken for longer than 24 hours. Longer brining breaks down the protein structure, making the meat spongy. These tips have saved my poultry countless times, and I’m confident they’ll work for you too.
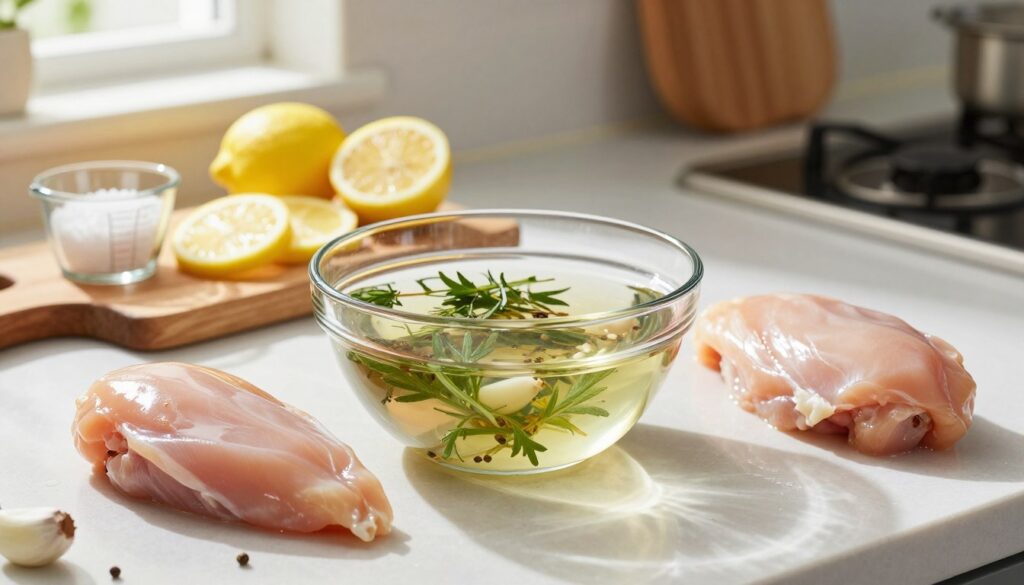
Marinating Techniques That Lock in Moisture
The right marinade can make chicken tender and moist. It’s different from brining, adding bold flavors and preventing dryness. A good marinade creates a flavorful shield around the chicken, keeping it juicy.
Marinades are not just about salt like brines. They use acids and oils to tenderize and add flavor. This makes the meat tender and flavorful, unlike brining alone.
How Marinades Tenderize and Add Moisture
Marinades work through chemical and physical changes. Acids break down proteins, making the meat tender. Oils coat the meat, slowing moisture loss during cooking.
This dual action is key to keeping chicken moist. Acids let flavors penetrate deeper, while oils seal in moisture and flavors.
Acids tenderize the chicken’s surface. This makes the meat more porous, allowing moisture and flavors to penetrate better.
Building a Balanced Marinade
Making a good marinade is simple once you know the basics. Mix acids, oils, and seasonings for the best results. Each element plays a crucial role in transforming chicken.
Balance is key. Too much acid makes the meat mushy. The right mix ensures flavor and moisture without losing texture.
Acids are the heart of a marinade. I use lemon juice, lime juice, vinegars, yogurt, and buttermilk for different flavors. Each adds its own unique taste.
Citrus juices add bright flavors, while vinegars offer deeper notes. Buttermilk and yogurt are gentler, making chicken tender with a tangy taste.
Use one-quarter to one-third acid in your marinade. This tenderizes the meat without overpowering it.
Oil-Based Elements for Moisture Barrier
Oils are crucial for keeping chicken moist. I use olive oil for Mediterranean dishes, vegetable oil for neutral flavors, and sesame oil for Asian dishes. Oils add richness and create a moisture barrier.
This barrier seals moisture inside the chicken, preventing it from evaporating too quickly. Oils also carry flavors from herbs and spices, distributing them evenly.
Aim for two parts oil to one part acid. This creates a balanced marinade that coats the chicken well without being greasy.
Herbs and Spices for Flavor
Get creative with your marinade to match any taste. Fresh herbs like rosemary and thyme add aromatic flavors. Garlic and ginger bring a pungent depth.
Dried spices like paprika and cumin add unique flavors. Soy sauce and hot sauce add umami and depth. Don’t be afraid to try new combinations.
Marinades let you adjust flavors to your liking while keeping the chicken tender and juicy.
Optimal Marinating Times to Avoid Over-Tenderizing
Timing is crucial when marinating chicken. Leaving it in acidic marinades too long can make it mushy. For boneless, skinless chicken breasts, marinate for two to four hours.
Bone-in pieces can marinate longer, up to eight hours. Whole chickens can marinate for six to twelve hours with gentler acids like buttermilk.
Use less time for acidic marinades and smaller cuts. For yogurt or buttermilk, you have more flexibility. Always marinate in the fridge, never at room temperature.
Use glass containers or resealable bags to coat every piece of chicken evenly. This keeps the chicken safe and flavorful.
Choosing the Right Cooking Method for Moist Chicken
Choosing the best way to cook chicken is key to a moist, flavorful meal. I’ve tried many techniques and found each has its strengths. The right method depends on the chicken cut.
Chicken breasts and thighs need different cooking methods. The perfect technique for a weeknight dinner might not work for a special occasion roast. Let’s explore my favorite methods and when to use them.
Roasting at Moderate Temperatures
Oven roasting is a go-to for me because it’s reliable and easy. The oven’s heat cooks the meat evenly and crisps the skin. High heat can dry out the chicken before it’s fully cooked.
When roasting, I preheat the oven fully and place the rack in the center. This ensures even cooking. Moderate temperatures cook the chicken gently, keeping it juicy.
My Preferred Method: 375°F to 400°F
Roasting at 375°F to 400°F gives the best results. It’s hot enough for crispy skin but gentle for juicy meat. A chicken breast takes 25 to 30 minutes, while bone-in pieces take 35 to 45 minutes.
This method minimizes overcooking. Lower temperatures give you more room for error, which is great for cooking for a crowd.
Pan-Searing with a Finishing Step
Pan-searing creates a flavorful crust through the Maillard reaction. But searing alone can leave the inside undercooked. That’s why I combine stovetop searing with oven finishing for restaurant-quality results at home.
This method works well for boneless, skinless chicken breasts. The initial sear locks in flavor, and the oven heat cooks it evenly.
Sear First, Then Finish in the Oven
Here’s my process: I heat a skillet over medium-high heat with oil. I add seasoned chicken breasts and sear them for 3 to 4 minutes per side. Then, I transfer the skillet to a preheated 375°F oven for 8 to 12 minutes.
This method combines stovetop flavor and texture with oven cooking. I always check the chicken’s internal temperature to ensure it reaches 160°F before removing it from the oven.
Slow Cooking and Braising for Foolproof Results
Slow cooking or braising is perfect for foolproof chicken. These moist-heat methods cook the chicken gently in liquid or steam. They prevent moisture loss and make the meat tender.
I love braising for tougher cuts like bone-in thighs and drumsticks. The liquid, aromatics, and low heat transform ordinary chicken into something spectacular. Slow cookers are great for this, requiring minimal attention and producing moist results.
The only downside is you won’t get crispy skin. But the tenderness and flavor are worth it for dishes like coq au vin or chicken cacciatore.
Grilling Without Drying Out the Meat
Grilling chicken can be tricky because of the direct heat and open flames. But I’ve found ways to make juicy, flavorful grilled chicken with beautiful char marks. The secret is controlling heat zones and managing moisture loss.
Grilled chicken offers unmatched smoky flavor. With the right approach, you can get a perfect balance of charred exterior and juicy interior.
Using Two-Zone Heat Setup
I always set up my grill with two distinct zones: one side with direct high heat and one side with indirect lower heat. For a gas grill, I turn on burners only on one side. For charcoal, I pile the coals on one half of the grill. This setup allows me to sear chicken over the hot zone and then finish cooking it gently in the cooler zone.
This technique prevents burnt-outside, raw-inside chicken. I start chicken pieces over direct heat for 2 to 3 minutes per side. Then, I move them to the indirect zone and close the lid to finish cooking.
Keeping the Lid Closed to Maintain Moisture
One big mistake when grilling is constantly opening the lid. Every time you lift the lid, you release heat and moisture, extending cooking time and drying out the meat. I’ve learned to resist the urge and keep the lid closed as much as possible.
When the lid stays down, the grill functions more like an oven. It traps heat and moisture around the chicken, creating a more stable cooking environment. This results in juicier chicken. I only open the lid to flip the chicken once and to check the internal temperature near the end of cooking.
Cooking Different Cuts: Tailored Approaches for Each
Every piece of chicken needs its own cooking method. Treating all chicken the same can lead to disappointment. The differences in cuts affect fat, bone, and muscle.
Understanding these differences changes how I cook chicken. What works for thighs doesn’t work for breasts. It’s all about matching the cooking method to the cut’s characteristics.
Chicken Breasts: Special Techniques for the Leanest Cut
Chicken breasts are the most challenging to cook. They have very little fat, making them hard to cook right. Keeping them moist is a big challenge.
Boneless, skinless breasts need gentle care. They lack fat, making them dry if not cooked right. This makes them prone to drying out if not careful.
Pounding to Even Thickness
Pounding breasts to even thickness helps a lot. I place them between plastic wrap and pound them until even. This ensures even cooking.
This method prevents the thin ends from drying out. Even thickness means even cooking all over.
I aim for a thickness of about three-quarters of an inch. It takes just a minute but makes a big difference.
Lower and Slower Cooking
Chicken breasts do well with moderate temperatures. I roast them at 375°F instead of high heat. This gives better control over doneness.
When pan-searing, I use medium heat. It takes longer but prevents overcooking. Patience is key with this lean cut.
Bone-In vs. Boneless: Understanding the Differences
Bone-in chicken cooks differently than boneless. The bone conducts and insulates heat. It slows cooking near the bone and keeps meat moist.
Bone-in pieces cook more evenly. The bone helps distribute heat, giving you more time to cook without overdoing it.
Boneless cuts cook faster but need more watching. Without the bone, they’re exposed to heat on all sides.
I recommend starting with bone-in pieces for beginners. They’re more forgiving and help you learn timing.
Dark Meat Thighs and Drumsticks: More Forgiving Cuts
Dark meat is forgiving for beginners. Thighs and drumsticks have more fat and connective tissue than breasts. This makes them hard to overcook.
Thighs can be cooked to 175°F or 180°F and still be juicy. The fat keeps them moist, and the connective tissue adds richness.
These cuts taste better with caramelization. I use higher heat to get a good sear. This enhances flavor without losing moisture.
Start with thighs if you’re new to cooking chicken. They build confidence before tackling white meat.
Whole Chicken Roasting Tips
Roasting a whole chicken is challenging. Different parts cook at different times. The breast cooks faster than the thighs and drumsticks.
I start the chicken breast-side down for 30-40 minutes. This protects the breast while the thighs cook. Then, I flip it to crisp the skin.
Shielding the breast with foil helps. Once the breast reaches 155°F, I cover it loosely. This slows its cooking while the thighs catch up.
Trussing the chicken helps even cooking. Tying the legs together and tucking the wings makes it cook more evenly.
Check temperature in multiple places when roasting a whole chicken. Test breasts, thighs, and drumsticks. Only when all are at the right temperature is it done.
The Power of Resting Time After Cooking
Resting time might seem like a waste, but it’s key to keeping chicken juicy. I’ve seen cooks work hard, only to lose all the juices when they slice it right away. This simple step makes a big difference.
Resting is the final, essential step of cooking. It’s not just waiting—important changes happen inside the meat. These changes decide if your chicken stays juicy or turns dry.
How Resting Redistributes Juices Throughout the Meat
Heat pushes moisture to the chicken’s center during cooking. This makes the outside dry and the inside tight. If you cut into it right away, all the juices spill out.
When you let chicken rest, the fibers relax. The pressure drops, letting juices spread evenly. So, when you slice it, the moisture stays in every bite.
Restaurant chicken tastes juicier because cooks know resting is crucial. They make sure to include it in their cooking plans every time.

My Recommended Resting Times by Cut
The size and thickness of your chicken affect resting time. Larger pieces need more time for juices to spread evenly.
Chicken Breasts: 5 to 10 Minutes
Smaller, thinner cuts don’t need as much time. For boneless, skinless chicken breasts, 5 to 10 minutes is enough. This brief rest helps juices spread without cooling the chicken too much.
This tip is simple yet effective. A few minutes of patience makes chicken much moister with no extra effort.
Whole Chicken: 15 to 20 Minutes
A whole roasted chicken needs more resting time due to its size. I always let whole birds rest for 15 to 20 minutes before carving. It’s a long wait, but it’s worth it.
During this time, the temperature evens out. The juices spread throughout, making every slice moist and flavorful.
Tenting with Foil vs. Leaving Uncovered
You can rest chicken by tenting it with foil or leaving it uncovered. Each method has its own benefits.
Tenting with foil keeps the chicken warm. It’s great for most situations, but it can soften crispy skin. This is a drawback if you want a crunchy exterior.
Leaving chicken uncovered preserves crispiness. The skin stays crunchy, but the meat cools down faster. This isn’t a problem for thinner cuts like chicken breasts.
I prefer to tent the chicken with foil for most of the resting time. Then, I remove the foil for the last 2 to 3 minutes. This keeps the meat warm while letting steam escape, preserving crispiness.
Carryover Cooking: What You Need to Know
Learning about carryover cooking changed how I cook chicken. It’s a key technique to share with you. This concept is often overlooked but crucial for moist poultry every time.
Carryover cooking is why many home cooks serve dry chicken. It happens after you remove the chicken from heat. Knowing this can improve your chicken cooking skills right away.
Heat Transfer After Removal from the Stove
When you take chicken off the heat, something important keeps happening. The outside is hotter than the inside. This heat moves inward, even after you turn off the stove.
During rest, the chicken’s internal temperature rises by 5 to 10 degrees Fahrenheit. So, if it’s 165°F when removed, it will be 170°F or 175°F by the time you cut into it. At these temperatures, the chicken can become dry.
I’ve tested this many times with my instant-read thermometer. The temperature keeps rising for 5 to 10 minutes after removal. The meat cooks itself with its own heat.
Setting Your Target Pull Temperature
Here’s the trick: I remove my chicken at 160°F internally. This allows it to reach the safe 165°F during rest. The result is perfectly cooked chicken, not overcooked.
This five-degree buffer is key to juicy chicken. Pulling at 160°F ensures the chicken is safe and moist. It avoids dryness.
Check the temperature in the thickest part about 5 minutes before it seems done. This way, you can pull it at the right time. Don’t wait until it shows 165°F on your thermometer, or it will be overcooked.
Size Matters for Temperature Rise
Carryover cooking affects larger cuts more than smaller ones. A whole chicken or thick breast retains more heat. The bigger the mass, the more the temperature rises.
When roasting a whole chicken, I’m careful about carryover. These birds can see a 10-degree temperature increase during rest. Pulling a whole chicken at 160°F is crucial for moist results.
Thin chicken breasts experience less carryover because they have less mass. But I still pull them at 160°F to be safe. Even a small rise can make lean breast meat dry.
Bone-in pieces retain more heat than boneless cuts. The bone helps conduct and store heat, extending carryover cooking. I always consider this when deciding the pull temperature for different cuts.
Preventing Moisture Loss During the Cooking Process
Keeping chicken moist is all about paying attention to every step. I’ve found simple ways to prevent dry chicken. These methods are easy to learn and use at home.
Think of these methods as insurance for juicy chicken. Each one tackles a different way to keep chicken moist. Using several of these techniques together greatly increases your chances of tender, juicy chicken every time.
Bringing Chicken to Room Temperature Before Cooking
I always take my chicken out of the fridge 20 to 30 minutes before cooking. This small step makes a big difference in how evenly it cooks. Cold chicken can cook unevenly, leading to dry edges and undercooked centers.
Room-temperature chicken cooks more evenly. This means no more dry edges and undercooked centers. Just remember, don’t leave chicken out for more than 30 minutes for food safety.
Using Covered Cooking Methods Strategically
Covering chicken during cooking creates a steamy environment that keeps moisture in. I use this method a lot for cooking lean chicken breasts. A lid, aluminum foil, or parchment paper can trap moisture that would evaporate.
For oven-roasted chicken breasts, I cover them for the first two-thirds of cooking. Then, I remove the cover to let the surface brown and develop flavor. This way, I get moist meat with appealing color.
When pan-cooking, I start with high heat for a good sear. Then, I reduce the heat and cover the pan. This method gently finishes cooking without drying out the meat. Just remember, it takes a bit longer.
Basting Techniques to Keep Surface Moist
Basting adds moisture and flavor to the chicken during cooking. I spoon pan juices, melted butter, or flavored oil over the chicken as it roasts. This keeps the surface moist.
Don’t overdo it. Opening the oven too often drops the temperature and extends cooking time. I baste every 15 to 20 minutes for roasted chicken, which is just right.
For basting liquid, I mix natural pan drippings with butter or olive oil. Sometimes, I add fresh herbs like thyme or rosemary. Each baste adds layers of flavor and keeps the meat moist.
Pounding Chicken Breasts for Even Thickness
Uneven chicken breasts can lead to dry meat. The thin end overcooks and dries out before the thick end is done. I solve this by pounding breasts to an even thickness before cooking.
Place the chicken breast between two sheets of plastic wrap or in a resealable plastic bag. Use a meat mallet, rolling pin, or heavy skillet to gently pound the thicker portion. Aim for consistent thickness of about three-quarters of an inch throughout.
This technique ensures even cooking. No more dry edges and undercooked centers. It also reduces cooking time, which helps prevent moisture loss.
Adding Butter Under the Skin
This restaurant trick makes skin-on chicken amazing. I carefully separate the skin from the meat without tearing. Then, I spread softened butter underneath before cooking.
The butter bastes the meat from the inside as it melts. I mix the softened butter with minced garlic, fresh herbs, lemon zest, or spices. This adds moisture and flavor that penetrates deep into the meat.
Use about one tablespoon of butter per chicken breast or two tablespoons for a whole chicken breast quarter. Gently massage the skin to distribute the butter evenly. The skin will crisp beautifully while the meat stays moist and flavorful underneath.
For whole roasted chicken, I add butter under the skin of both the breast and thighs. This approach ensures the entire bird benefits from the moisture-retaining properties of the butter. The results are juicy meat with crispy, golden skin.
Common Mistakes I See People Make
I’ve made plenty of mistakes myself, learning what makes chicken dry. Friends, family, and even experienced cooks often fall into these traps. Once you know these errors, avoiding them is easy.
Many ask, “why is my chicken dry?” The answer often lies in these common mistakes. Let’s explore the issues I see most often and why they cause problems.
Cooking Cold Chicken Straight from the Refrigerator
Putting cold chicken in a hot pan or oven is a common mistake. The outside cooks fast, while the inside stays cold.
This uneven cooking makes you cook the chicken too long. By then, the outside is dry and overcooked.
Letting chicken sit at room temperature for 20-30 minutes helps. It ensures even heat and shortens cooking time.
Cutting into Chicken Immediately After Cooking
It’s tempting to cut into chicken right away. But doing so lets juices spill out. These juices should stay inside the meat.
Resting chicken for 5-10 minutes after cooking makes a big difference. The meat becomes juicier and more flavorful.
Skipping the resting period always makes me regret it. The liquid on my cutting board is a reminder of lost moisture.
Using High Heat for Extended Periods
High heat is good for browning and crispy skin. But using it too long makes the meat dry and tough.
High heat quickly removes moisture from chicken. The longer it’s exposed, the drier it gets.
I use high heat for searing, then lower it for the rest of cooking. This way, I get flavor and moisture.
Not Using a Meat Thermometer
Not using a thermometer is a big mistake. Guessing doneness can lead to overcooking and dry chicken.
People often cook chicken for the time in a recipe without considering oven temperature or chicken size. This makes cooking time unreliable.
An instant-read thermometer solves this problem. It gives accurate temperature readings, preventing overcooking and ensuring safety.
Here’s why I always use a thermometer:
- Provides accurate temperature readings within seconds
- Prevents overcooking that leads to dry chicken
- Ensures food safety without sacrificing moisture
- Accounts for variations in oven temperature and chicken size
Overcrowding the Pan
Putting too much chicken in a pan causes several problems. Cold chicken lowers the pan’s temperature.
This leads to steaming instead of browning. It also makes cooking take longer and prevents flavorful browning.
I always leave enough space between chicken pieces—at least half an inch. This ensures heat circulates well and moisture evaporates.
If your chicken is dry, check if you’ve made one of these mistakes. Fixing just one or two can greatly improve your results.
Conclusion
Cooking moist, tender chicken is easier than you think. It’s all about controlling the temperature, preparing the meat right, and being patient during the resting time.
An instant-read thermometer is the best investment for cooking chicken. It takes away the guesswork that leads to dry chicken. You’ll know exactly when it’s cooked to perfection.
My top tips for juicy chicken include dry brining for flavor, pulling it at 160°F, and letting it rest before cutting. These steps alone can make a big difference.
Try out different methods like brining, marinating, and various cooking techniques. See what works best for you and your cooking setup. You might find slow cooking or pan-searing is your favorite.
Start with the basics: use a thermometer, let it rest, and don’t overcook. Then, you can experiment and improve your chicken’s juiciness and taste.
You now have all the tools to make restaurant-quality chicken at home. This challenging protein can become something you cook with confidence. Your family and friends will definitely notice the difference.
FAQ
What is the most common reason my chicken turns out dry?
Overcooking is the main reason. Cooking chicken too long makes it tough. To avoid this, use an instant-read thermometer. Pull chicken at 160°F to ensure it reaches 165°F during resting without drying out.
Do I really need a meat thermometer to cook chicken?
Yes, you do. A meat thermometer is key to preventing dry chicken. Guessing cooking time or appearance is unreliable. I use the ThermoWorks ThermoPop or Lavatools Javelin to ensure accurate cooking.
Why is my chicken breast dry but my thighs always turn out juicy?
Chicken breasts are leaner than thighs, making them more prone to drying. Thighs have more fat and collagen, which helps keep them moist. Breasts need gentler heat and careful monitoring to stay moist.
How long should I let chicken rest after cooking?
Rest chicken breasts for 5 to 10 minutes and whole chickens for 15 to 20 minutes. This allows juices to redistribute, making the meat juicier. It’s why restaurant chicken is often more moist.
What temperature should I cook chicken to for it to be safe but not dry?
Cook chicken to 165°F for safety. But, pull it at 160°F to avoid overcooking. This method ensures the chicken is safe and juicy. Always check the temperature in the thickest part of the meat.
Does brining really make a difference in keeping chicken moist?
Yes, brining is a game-changer. Wet brining or dry brining with salt adds moisture and flavor. It makes chicken juicy and enhances taste.
What’s the best cooking method to prevent dry chicken?
Pan-searing and oven finishing are great for breasts. Roasting at 375°F to 400°F works well for whole chickens. Slow cooking and braising are also good because they cook gently in liquid.
Should I bring chicken to room temperature before cooking?
Yes, let chicken sit at room temperature for 20 to 30 minutes before cooking. This ensures even cooking and prevents overcooking the exterior before the interior is safe.
What is carryover cooking and why does it matter?
Carryover cooking is when meat continues to cook after being removed from heat. It’s important to pull chicken at 160°F to account for this. It ensures the chicken is safe without being overcooked.
How can I keep chicken moist when grilling?
Use a two-zone heat setup on your grill. Sear chicken over hot zones for flavor, then finish over cool zones to prevent drying. Keeping the lid closed helps trap heat and moisture.
Why does pounding chicken breasts help prevent dryness?
Pounding breasts to even thickness ensures even cooking. This prevents the thin end from drying out before the thick end is safe. It helps every part of the breast cook evenly.
How long should I marinate chicken?
Marinate chicken breasts for 2 to 4 hours and bone-in pieces for up to 8 hours. Acidic marinades tenderize the meat, while oil adds moisture. This keeps chicken juicy and flavorful.
Should I tent chicken with foil while it rests?
Loosely tent chicken with foil to keep it warm during resting. But, this can soften crispy skin. If you want crispy skin, rest uncovered or remove foil for a few minutes.
What’s the difference between wet brining and dry brining?
Wet brining involves soaking chicken in saltwater, while dry brining uses salt rubbed on the chicken. Both methods retain moisture. I prefer dry brining for crispy skin.
Can I fix chicken that’s already overcooked and dry?
Once chicken is overcooked, you can’t restore its moisture. But, you can use it in sauces, soups, or casseroles. Prevention is always better than trying to fix it.
Why does my chicken breast have a rubbery texture?
Rubbery chicken comes from cooking at too high a temperature for too long. Cooking at moderate temperatures prevents this. It ensures the meat is tender and juicy.
Does adding butter under the skin really help keep chicken moist?
Yes, adding butter under the skin makes a big difference. It melts and bastes the meat, adding moisture and flavor. This works well for breasts, whole chickens, and thighs.
What should I do if I don’t have time to brine chicken?
If you’re short on time, focus on other techniques. Pound chicken, use a thermometer, and rest it properly. Even without brining, these steps can make chicken juicy. A quick wet brine is better than nothing.
How do I prevent chicken from drying out when reheating leftovers?
Reheat chicken gently at low temperatures. Add chicken broth or water and cover with foil. For the microwave, use a damp paper towel. Low heat and moisture help prevent drying.
Why does overcrowding the pan make chicken dry?
Overcrowding lowers the pan’s temperature, causing chicken to steam instead of brown. This extends cooking time and leads to moisture loss. Give each piece enough space for even cooking.
