There’s nothing more disappointing than cutting into a piece of chicken only to find it dry, rubbery, and completely lifeless. We’ve all been there — you follow the recipe, you cook it through, and somehow it still ends up tasting like a sponge. The good news? Juicy, tender chicken isn’t some restaurant secret that’s out of reach for home cooks. It’s actually a matter of understanding a handful of key techniques that, once you learn them, will completely transform every chicken dish you make.
Whether you’re working with boneless chicken breasts, bone-in thighs, or anything in between, the principles of keeping chicken moist and tender apply across the board. In this guide, I’m walking you through 7 game-changing steps that will have you making perfectly juicy chicken every single time. No more dry dinners, no more guessing — just consistently delicious results you’ll be proud to put on the table.
Step 1: Choose the Right Cut for Your Cooking Method
Before you even turn on the stove, your first decision — the cut of chicken — is one of the most important factors in getting a juicy result. Boneless, skinless chicken breasts are the most popular cut, but they’re also the least forgiving. They have almost no fat, which means they dry out fast if you’re not careful. Chicken thighs, on the other hand, have significantly more intramuscular fat and connective tissue, which means they stay moist and flavorful even if you accidentally cook them a few degrees past done.
That said, there’s a cut for every method. Bone-in, skin-on pieces are ideal for roasting and grilling because the bone conducts heat more evenly and the skin protects the meat underneath. Boneless breasts are great for quick pan-searing or pounding thin for cutlets. Drumsticks and wings are incredibly forgiving and almost impossible to dry out. If you’re a beginner or you’ve had bad luck with dry chicken, start with thighs — they’re cheaper, tastier, and practically foolproof.
Also pay attention to thickness and uniformity. A chicken breast that’s 1 inch thick on one end and half an inch on the other is going to cook unevenly no matter what you do. We’ll address this in the next step, but understanding your cut is the foundation of everything that follows.
Step 2: Pound or Butterfly for Even Thickness
Uneven chicken is one of the sneakiest causes of dry meat. When one part of the breast is much thicker than the other, the thin end overcooks and dries out before the thick end reaches a safe internal temperature. The fix is simple and takes about 60 seconds: pound it out. Place your chicken breast between two sheets of plastic wrap or in a zip-lock bag and use a meat mallet, rolling pin, or even the bottom of a heavy pan to pound it to an even thickness — about ¾ of an inch works well for most methods.
Alternatively, for thicker breasts, you can butterfly them — slice them horizontally almost all the way through, then open them up like a book. This doubles the surface area, reduces cooking time, and ensures even cooking throughout. Butterflying is especially useful if you’re planning to stuff the chicken or if you want it to cook in under 15 minutes on a skillet or grill.
This step is non-negotiable if you’re working with supermarket chicken breasts, which are often enormous and wildly uneven due to modern farming practices. Taking two minutes to even them out before cooking will make a noticeable difference in the final texture of your dish.
Step 3: Brine or Marinate Before Cooking
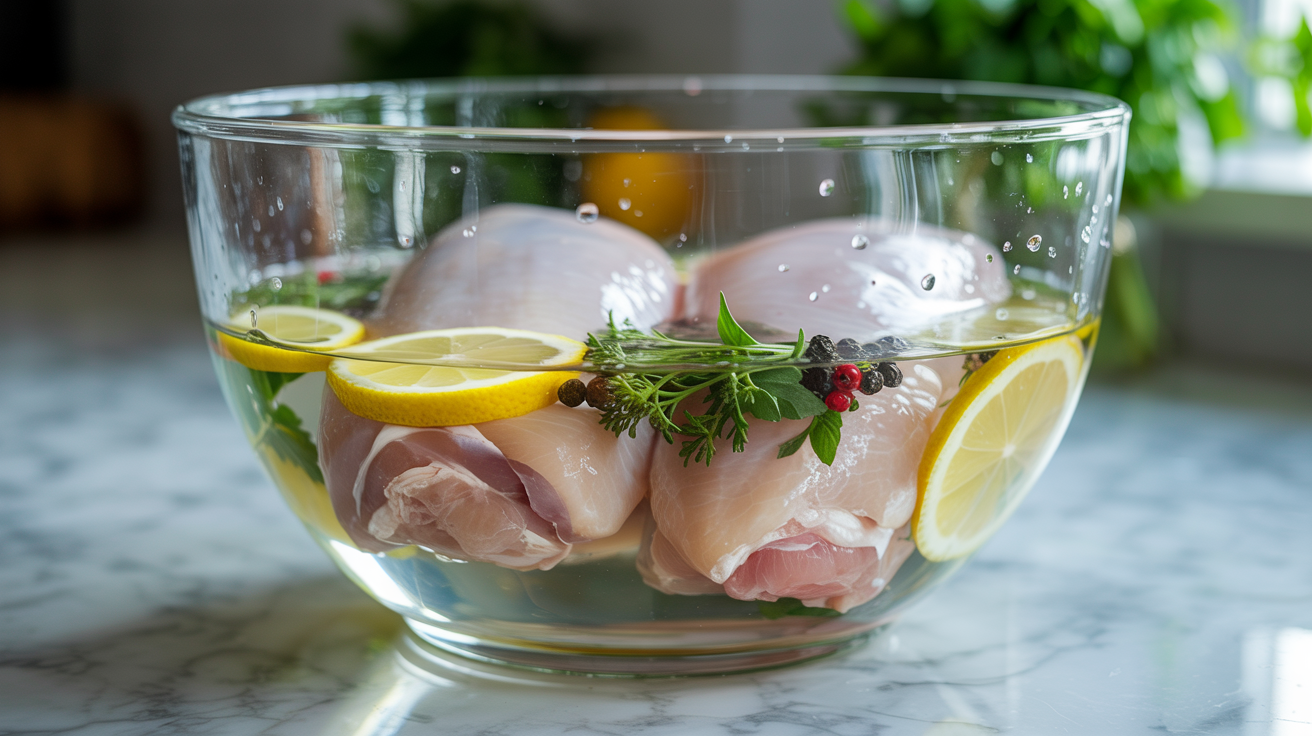
Brining and marinating are your two best friends when it comes to building moisture and flavor into chicken before it ever hits the heat. A simple wet brine — just water, salt, and optionally a little sugar — works through osmosis to help the chicken absorb and retain more moisture during cooking. For boneless breasts, even a 30-minute brine in a saltwater solution (about 1 tablespoon of kosher salt per cup of water) makes a measurable difference. For thicker cuts or whole birds, you can brine for up to 24 hours in the fridge.
Marinades go one step further by adding flavor while also tenderizing the meat. Acidic components like lemon juice, buttermilk, or yogurt help break down protein structures slightly, creating a more tender bite. Fat in a marinade — like olive oil — coats the muscle fibers and helps prevent moisture loss during cooking. Our Marinated Lemon Herb Grilled Chicken is a perfect example of how just a few hours in a simple marinade can take your chicken from bland to absolutely spectacular.
One important caution: don’t over-marinate in highly acidic mixtures. Leaving chicken in straight lemon juice or vinegar for more than 2–4 hours can actually start to denature the proteins too aggressively, giving the outside a mushy or mealy texture. Aim for the sweet spot of 2–8 hours for most marinades, and you’ll be golden.
Step 4: Bring Chicken to Room Temperature Before Cooking
This is a small step that makes a surprisingly big difference. When you take chicken straight from the refrigerator (around 38°F) and put it into a hot pan or oven, the outside of the meat starts cooking while the interior is still very cold. This temperature lag causes the outside to overcook before the center reaches a safe temperature — which is exactly how you end up with dry, overcooked edges and an underdone middle.
The solution is simply to let your chicken sit on the counter for 20–30 minutes before cooking. This allows the temperature to rise slightly — not to room temperature exactly, but enough to reduce that thermal gap. You’re not leaving it out long enough to worry about food safety; harmful bacteria don’t multiply significantly in that short window, especially if your kitchen isn’t extremely warm.
This step is especially important for thicker cuts and bone-in pieces where the temperature differential is even more pronounced. Pair this with a hot cooking surface and you’ll get a beautifully even cook from edge to center every single time.
Step 5: Use High Heat to Sear, Then Finish Low
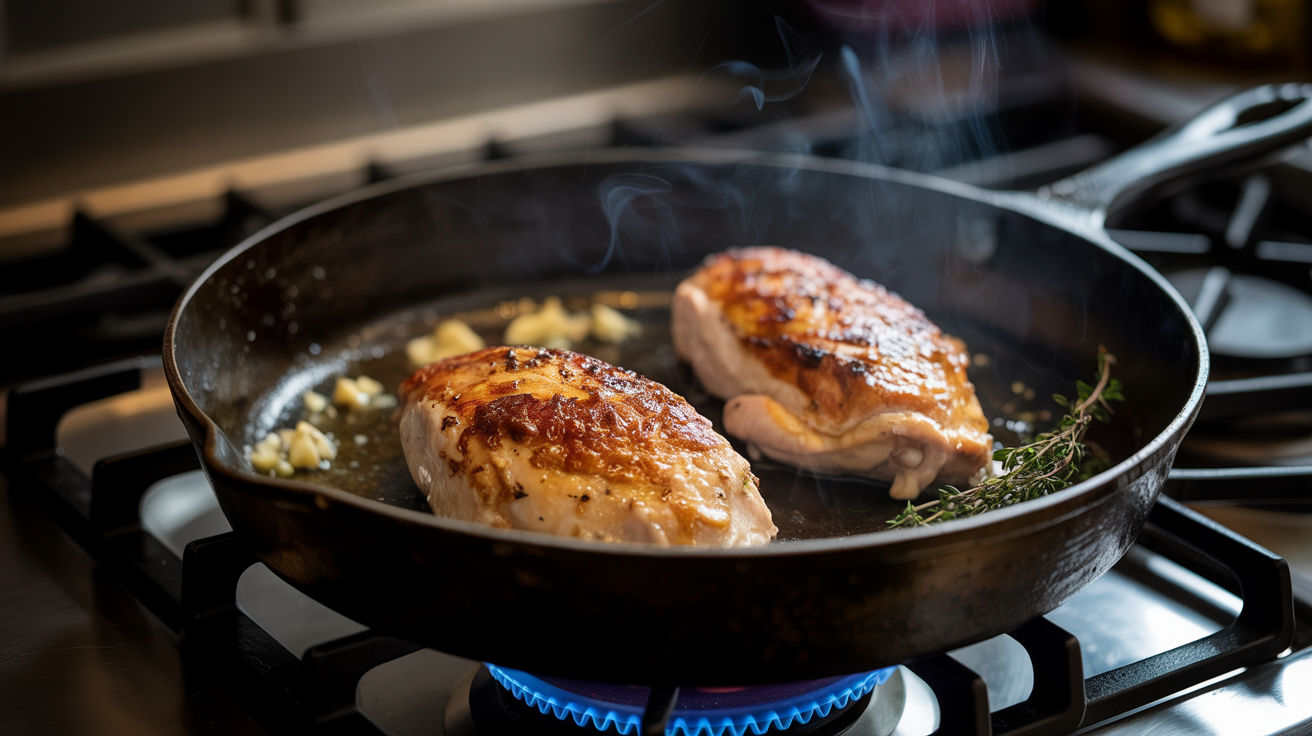
The sear-then-finish method is one of the most reliable techniques for getting juicy chicken with a gorgeous crust. Start by getting your pan — ideally a cast iron or stainless steel skillet — screaming hot with a high-smoke-point oil like avocado or grapeseed oil. Lay your chicken in the pan and don’t touch it. Let it sear for 3–4 minutes until a deep golden-brown crust forms. That crust isn’t just beautiful — it adds texture and flavor while also acting as a partial moisture barrier.
Once you have your sear, you can either flip and finish in the pan over medium heat, or transfer the whole skillet to a 375°F oven to finish cooking gently and evenly. Finishing in the oven is particularly great for thicker cuts because the gentle, ambient heat allows the interior to come up to temperature without the exterior over-cooking. This technique is what makes our Creamy Tuscan Skillet Chicken so consistently tender and full of flavor.
For chicken breasts cooked this way, you’re looking at about 6–8 minutes in a 375°F oven after searing, depending on thickness. Always verify with a thermometer rather than just going by time.
Step 6: Use a Meat Thermometer — Every Single Time
If there’s one tool that will save your chicken more than any technique or marinade, it’s a reliable instant-read meat thermometer. The USDA recommends cooking chicken to an internal temperature of 165°F — and that’s the number you should be pulling out of the heat at, not guessing at based on how it looks or how long it’s been cooking. Visual cues like clear juices and firmness are unreliable and have caused countless dry, overcooked dinners.
Insert the thermometer into the thickest part of the meat, away from any bones (bones conduct heat and will give you a falsely high reading). For chicken breasts, you can actually pull them off the heat at 160°F because carryover cooking — the residual heat that continues to cook the meat after it leaves the heat source — will bring it up to 165°F during the rest period. This small trick often means the difference between just-right and just-overdone.
Invest in a quality instant-read thermometer like a Thermapen or a ThermoWorks Dot. It’s one of the best $20–$100 investments you can make as a home cook, and it pays for itself the first time it saves a dinner party from disaster. Check out our Oven-Baked Garlic Parmesan Chicken Breast for a recipe where hitting that perfect temperature makes all the difference.
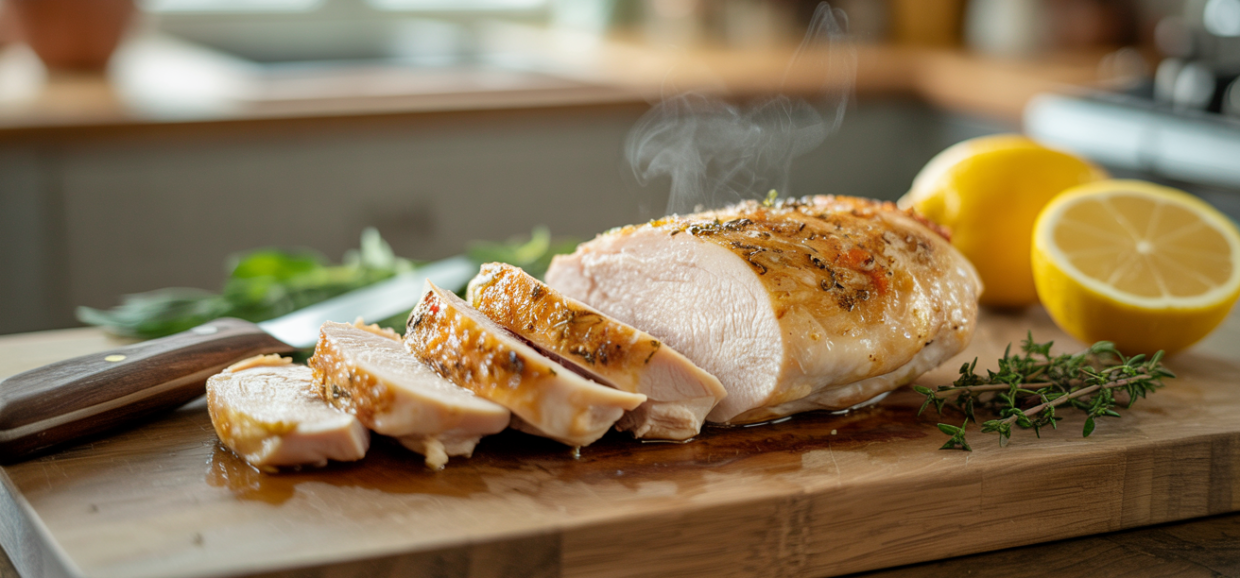
Step 7: Rest the Chicken Before Cutting
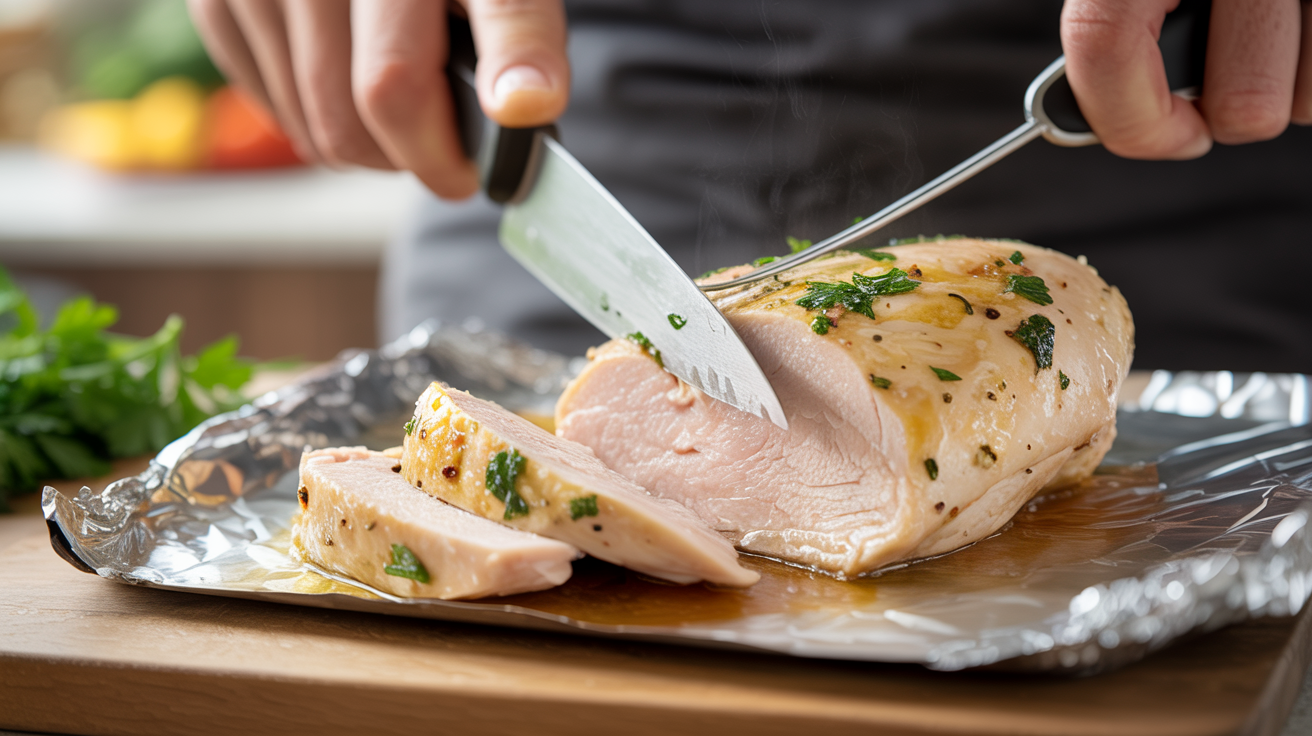
You’ve brined, seared, thermometer-checked, and perfectly cooked your chicken — don’t blow it now by cutting in immediately. Resting is the final and absolutely essential step for juicy chicken. When meat cooks, the muscle fibers contract and push moisture toward the center of the meat. If you cut it open right away, all of that accumulated juice runs straight out onto your cutting board. Wait 5 minutes for breasts and cutlets, or up to 10 minutes for larger pieces and bone-in cuts, and those juices redistribute back throughout the meat.
To rest properly, transfer the chicken to a clean cutting board or plate and loosely tent it with foil. The tent traps a little heat to keep the chicken warm without trapping steam that would soften your beautiful crust. This is also a good time to make a quick pan sauce — deglaze that skillet with a splash of white wine or chicken broth, scrape up all the golden bits, add a knob of butter, and you’ve got an incredible sauce ready by the time the chicken is rested.
Resting chicken seems like the kind of step you can skip when you’re hungry and impatient, but it’s genuinely worth those extra minutes. The difference in moisture retention between rested and un-rested chicken is significant and noticeable. Make it a habit, and you’ll never look back.
Frequently Asked Questions
Why does my chicken breast always come out dry even when I follow a recipe?
The most common culprits are overcooking (going past 165°F internal), cooking cold chicken straight from the fridge, or skipping a brine or marinade. Try using a meat thermometer and pulling the chicken at 160°F to account for carryover cooking.
Is it better to bake or pan-sear chicken for juiciness?
The best results usually come from combining both: sear in a hot skillet first for a golden crust, then finish in the oven at 375°F. Either method alone can work, but the combination gives you the most flavorful and evenly cooked chicken.
How long should I marinate chicken?
For most marinades, 2–8 hours is ideal. If the marinade contains strong acids like lemon juice or vinegar, keep it to 2–4 hours to avoid a mushy texture. Buttermilk or yogurt-based marinades are more forgiving and can go up to 24 hours.
Can I brine and marinate chicken at the same time?
Yes, some marinades function as brines when they contain enough salt. A good rule of thumb: if your marinade is well-salted and acidic, it’s doing double duty. You don’t need to do a separate brine first.
What temperature should I cook chicken breast to?
The USDA recommends 165°F, but you can safely remove chicken from heat at 160°F and allow carryover cooking during the rest period to bring it up to the recommended safe temperature.
Making chicken tender and juicy every time is completely within your reach — it’s not luck, it’s technique. Start with the right cut, give it time to brine or marinate, cook it evenly, monitor the temperature carefully, and let it rest before serving. Apply these seven steps consistently and you’ll wonder how you ever struggled with dry chicken in the first place. Now go make something delicious!
