Okay, let me tell you about the thing that completely changed my Sunday afternoons. About two years ago, I was spending way too much money on takeout lunches and feeling pretty gross by Wednesday every week. Then I started making buffalo chicken meal prep bowls, and honestly? I haven’t looked back. There’s something about that spicy, tangy, buttery hot sauce coating tender chicken that just doesn’t get old — even on day five. And when you’ve got everything portioned out and ready to grab from the fridge, weekday-you is going to be SO grateful to weekend-you.
As an Amazon Associate, this site earns from qualifying purchases. Some links on this page are affiliate links.
This guide is everything I’ve learned from making these bowls pretty much every single week for two years straight. I’ve messed up the chicken (dry, rubbery, sad), I’ve used the wrong containers (soggy rice, limp lettuce), and I’ve figured out what actually keeps well for five days versus what turns into a science experiment by Thursday. Whether you’re brand new to meal prep or you’re just looking for a buffalo chicken recipe that actually holds up all week, I’ve got you. Let’s get into it.
Step 1: Choose Your Base and Plan Your Bowl
Before you even think about turning on your oven, you need to decide what kind of bowl you’re building. Your base grain or starch is the foundation, and it matters more than you think for meal prep longevity. White rice is the classic — it reheats beautifully and soaks up buffalo sauce like a champ. Brown rice works great too and adds more fiber to keep you full. Try my Buffalo Chicken Rice Bowls with Blue Cheese Drizzle if you want to go that route. Quinoa is another fantastic option that holds its texture all week — check out the Spicy Buffalo Chicken Quinoa Bowls for that version.
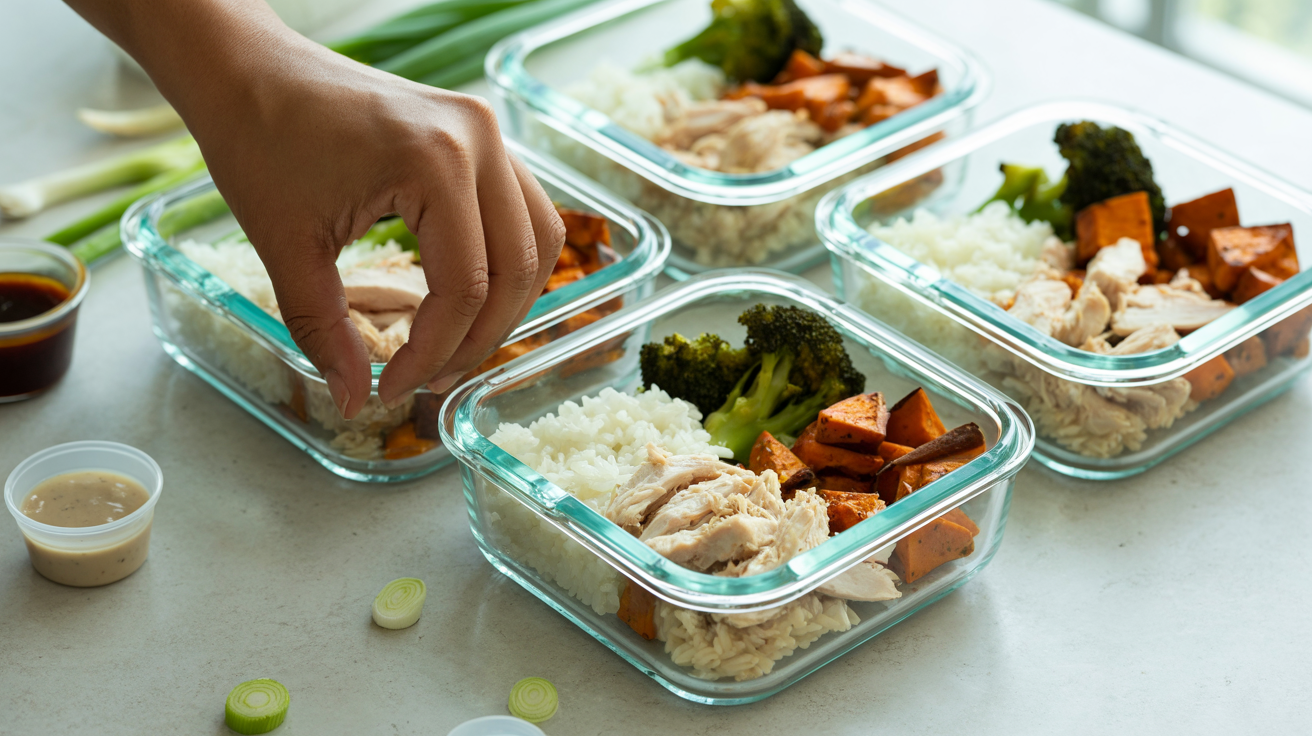
If you’re watching carbs, Mild Buffalo Chicken Cauliflower Rice Bowls are the way to go, though fair warning — cauliflower rice releases more moisture over the week, so you’ll want to keep it separate until serving. Sweet potatoes are another killer base that adds a natural sweetness against all that heat. My Buffalo Chicken Sweet Potato Bowls are probably my most-requested recipe from coworkers. Plan for about ¾ cup of cooked base per bowl, and prep enough for 5 servings.
Step 2: Prep and Cook the Chicken Perfectly
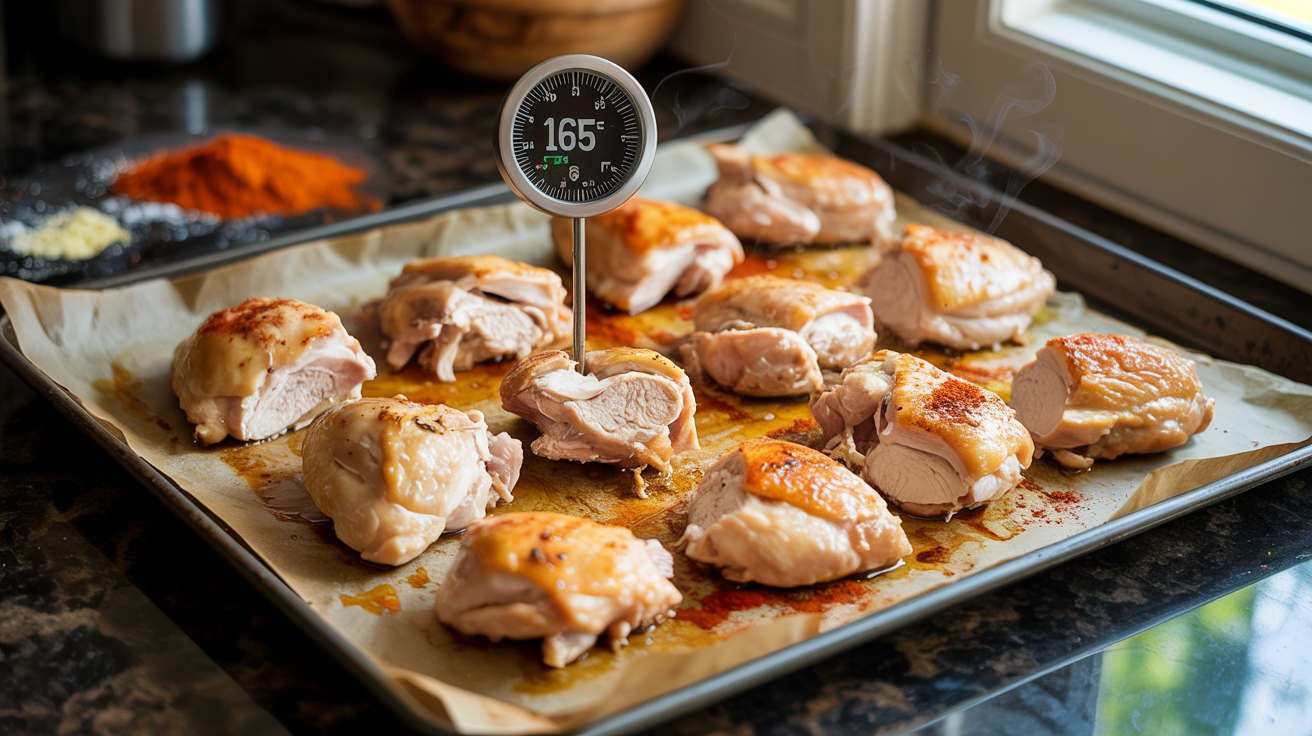
This is where most people go wrong, and I totally get it because I ruined so many chicken breasts before I figured this out. The secret to meal prep chicken that’s still tender on Friday? Don’t overcook it. Period. I use boneless, skinless chicken thighs about 80% of the time because they’re more forgiving and stay juicier over multiple days of refrigeration. You’ll need about 2.5 pounds for 5 generous bowls.
Here’s my method: Preheat your oven to 425°F. Pat the chicken completely dry with paper towels — you should hear a slight squeaking sound, that’s how dry. Season with garlic powder, onion powder, smoked paprika, salt, and pepper. Lay them on a sheet pan lined with parchment paper (not foil — the chicken sticks). Roast for 18-22 minutes until the internal temp hits 165°F. Let them rest for a full 10 minutes before you even think about cutting them. That resting time lets the juices redistribute, which means they won’t dry out as fast in the fridge. Dice or shred — shredded soaks up more sauce, diced holds its shape better. Your call.
Step 3: Make Your Buffalo Sauce (Yes, From Scratch)
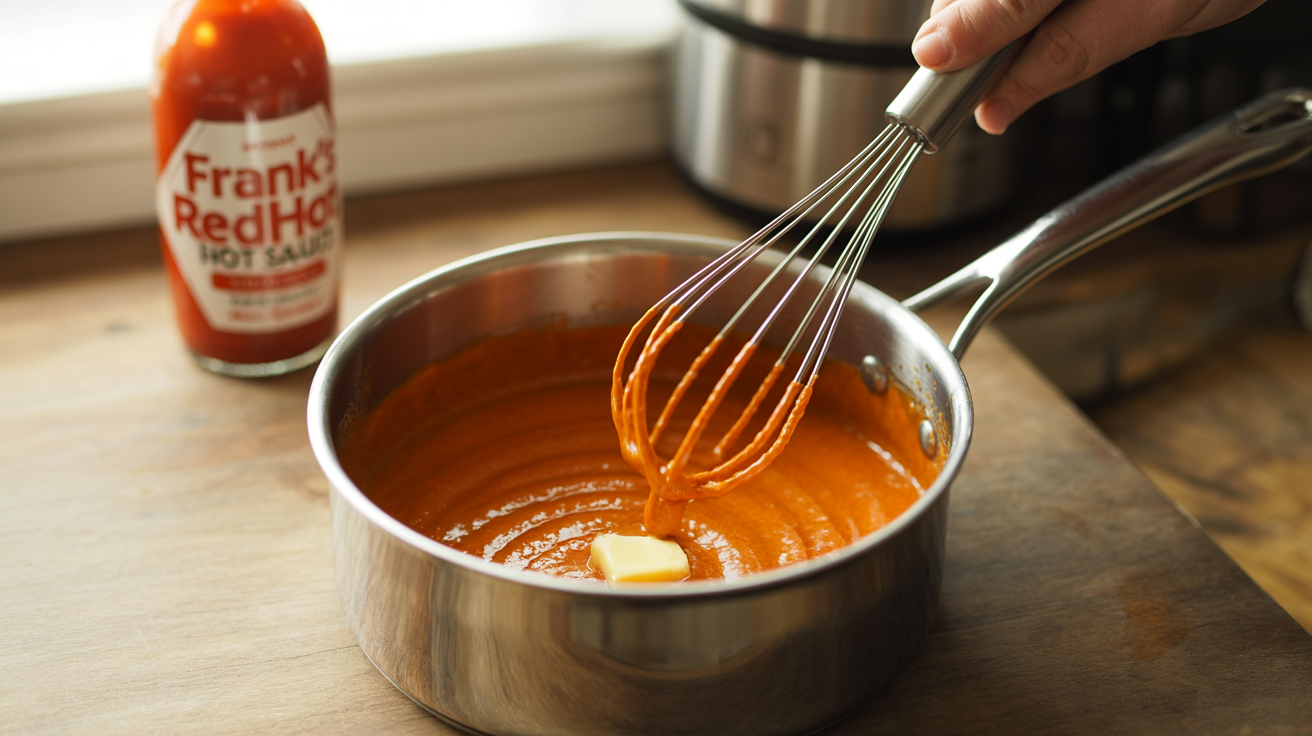
Store-bought buffalo sauce is fine, I’m not going to judge you. But making it yourself takes literally four minutes and tastes noticeably better. Melt ⅓ cup of butter in a small saucepan over medium heat. When it’s foamy and smells nutty, add ½ cup of Frank’s RedHot (or your preferred hot sauce), 1 tablespoon of white vinegar, ¼ teaspoon of garlic powder, and a pinch of cayenne if you want more kick. Whisk it together until it’s smooth and slightly thickened, about 2 minutes. That’s it.
Now here’s a critical meal prep tip: don’t toss the chicken in the sauce before storing. I know it’s tempting, but sauce-coated chicken gets soggy and the flavor gets muted by day three. Instead, portion your sauce into small containers or even those little 2-oz deli cups, and toss the chicken right before you eat. This one habit is the difference between a bowl that tastes freshly made and one that tastes like leftovers. For sweeter variations, my Honey Buffalo Chicken Brown Rice Bowls use a honey-butter-hot-sauce combo that’s incredible.
Step 4: Roast Your Vegetables
While your chicken is roasting, get your veggies going on a second sheet pan. This is where you can really customize things. My go-to combination is diced sweet potatoes (½-inch cubes), broccoli florets, and red onion wedges. Toss everything with olive oil, salt, pepper, and a little garlic powder. The sweet potatoes need about 25 minutes at 425°F, and the broccoli needs about 15, so I stagger them — potatoes go in first, broccoli joins halfway through.
The Buffalo Chicken and Roasted Veggie Bowls use this exact method and it’s probably the most well-rounded version for everyday lunches. You want the edges of your veggies to be caramelized and slightly crispy — they’ll soften a bit in the fridge, so going a little harder on the roast actually helps them hold up better. Other great veggie options: zucchini, bell peppers, corn, or roasted cherry tomatoes. Aim for about 1 cup of roasted veggies per bowl.
Step 5: Prepare Your Cool Components and Toppings
This step is what separates a sad desk lunch from something you’re actually excited to eat at noon. Cool toppings add crunch, freshness, and contrast to all that warm, saucy chicken. Shred some romaine or iceberg lettuce, dice up celery (classic buffalo pairing — the crunch is unreal), slice some green onions, and if you’re into it, crumble some blue cheese. The Buffalo Chicken Caesar Salad Meal Prep Bowls lean heavily into the fresh greens angle and they’re perfect for summer.
Here’s the thing though — fresh components MUST be stored separately. I use small snack-sized bags or separate compartments if your containers have dividers. Lettuce, celery, sliced cucumber (try the Buffalo Chicken Greek Yogurt Bowls with Cucumber — that cool cucumber against hot sauce is everything), and any herbs go into their own little bags. Dressings and drizzles — ranch, blue cheese, Greek yogurt — also get their own tiny containers. I buy those little 2-oz plastic cups with lids in bulk. The Creamy Ranch Buffalo Chicken Bowls are my wife’s favorite precisely because of that cool ranch against the heat.
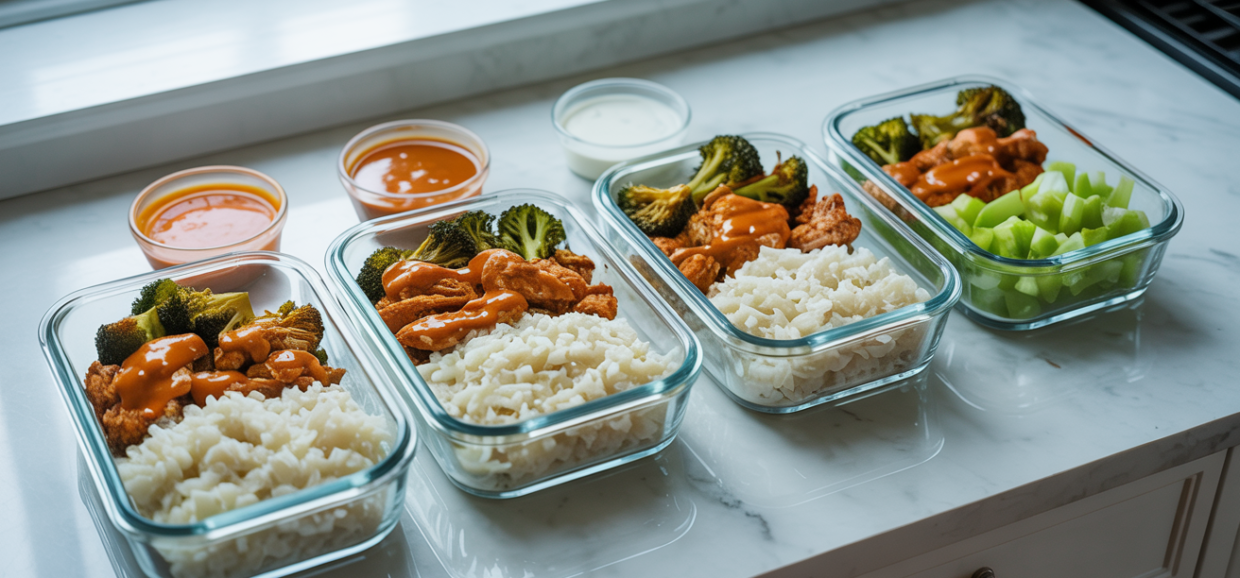
Step 6: Assemble and Store Your Bowls
Assembly time! This is honestly the satisfying part — lining up five containers on your counter and filling them up feels like you’ve got your life together. Start with your base layer of grain or starch on one side. Add your roasted veggies on the other side. Place your chicken (unsauced, remember!) in another section. If you’re using containers without dividers, at least try to keep things in separate little piles rather than mixing everything together.
For containers, glass is king. I use 36-oz glass containers with snap-lock lids. They don’t stain from the buffalo sauce (plastic containers WILL turn orange permanently — learned that the hard way), they reheat evenly in the microwave, and they don’t absorb smells. Let everything cool to room temperature before sealing — trapping steam creates condensation, which makes everything soggy. Once sealed, these bowls keep perfectly for 5 days in the fridge at 40°F or below. The Classic Buffalo Chicken Meal Prep Bowls recipe has the exact portions dialed in if you want to follow it precisely.
Step 7: Reheat and Serve Like a Pro
When it’s go time, remove any fresh toppings and sauce containers you stored separately. Microwave the bowl (with chicken, grains, and roasted veggies) for 2-2.5 minutes, stirring halfway through. If you have access to a toaster oven at work, even better — 350°F for about 8 minutes gives you slightly crispy edges that the microwave just can’t replicate. Once it’s hot, drizzle your buffalo sauce over the chicken, toss on your fresh toppings, add your ranch or blue cheese, and you’re eating better than 90% of the people around you.
One more trick I love: keep a bottle of hot sauce at your desk or in your work fridge. By Thursday or Friday, flavors can mellow a bit, and a fresh hit of Frank’s wakes everything right back up. If you want to rotate through the week so you don’t get bored, prep two different versions — maybe Honey Buffalo Chicken Brown Rice Bowls for Monday through Wednesday and Spicy Buffalo Chicken Quinoa Bowls for Thursday and Friday. Same chicken, different bases and toppings, totally different feel.
Frequently Asked Questions
Can I freeze buffalo chicken meal prep bowls?
Yes, but with caveats. The chicken, grains, and roasted veggies freeze great for up to 3 months. Don’t freeze any fresh components like lettuce, celery, or cucumber — they’ll turn to mush. Thaw overnight in the fridge and reheat as usual. I sometimes batch-cook a double recipe and freeze half for the following week so I get a break from Sunday prep.
How do I keep the chicken from drying out by the end of the week?
Three things: use chicken thighs instead of breasts, don’t overcook them (use a meat thermometer!), and keep the sauce separate until serving. If your chicken does feel a little dry by day four or five, add a splash of chicken broth before microwaving — it steams the chicken and brings it back to life.
What if I don’t like blue cheese?
Ranch is the obvious substitute, and it’s honestly just as good. Greek yogurt mixed with a little ranch seasoning packet is a high-protein option that works amazingly. The Buffalo Chicken Greek Yogurt Bowls with Cucumber go this route and they’re super refreshing.
Is this actually cheaper than buying lunch?
Way cheaper. I spend about $18-22 on ingredients for five bowls, which comes out to roughly $4 per lunch. Compare that to $12-15 for a takeout bowl and you’re saving around $40-50 per week. That’s over $2,000 a year. I bought a pretty nice stand mixer with my first year of meal prep savings, just saying.
Can I use rotisserie chicken to save time?
Absolutely. A store-bought rotisserie chicken is a perfectly good shortcut. Shred it up, portion it out, and proceed as normal. You’ll miss out on that freshly seasoned flavor, but on weeks when you’re short on time, it cuts your active prep time down to about 20 minutes total.
Meal prepping doesn’t have to be boring, and it definitely doesn’t have to feel like a chore. These buffalo chicken bowls are the kind of thing where you actually look forward to lunch — where you’re sitting at your desk at 11:30 already thinking about cracking open that container. Start with the Classic Buffalo Chicken Meal Prep Bowls and then branch out to different variations once you’ve got the rhythm down. Your wallet, your waistline, and your future self will thank you. Now go buy some glass containers and clear out a shelf in your fridge — you’ve got bowls to build.